

The Simulator Diaries
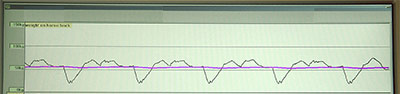 |
This shows the variations in the rider weight over 5 canter strides. The dips down show her weighing less than her actual weight, the trace. above the pink line shows her weighing more. (Think of jumping up and down on the bathroom scales!) |
| This trace shows variations as the rider's weight comes ahead or behind the horse's centre of gravity. The average pink line is almost exactly in place, while the black line shows moment-to-moment variations. | |
| This trace shows changes as the rider's weight shifts to right or left of the midline. The peaks above the line show her weight to the left, those below the line show it to the right. The average pink line is marginally to the left. | |
| These traces show rein tension, red is the right rein, green is the left. This represents a light contact which is relatively constant and even between both reins. | |
| This trace shows changes in drive (the equivalent of pushing on the horse's quarters) or retard (the equivalent of pushing on its chest). The average pink line is in the neutral place. |
December 2006.
I have only in the last few days taken delivery of my computerized horse simulator, and am beginning to learn how to use it. To switch on everything in the right order and to get it up and running is already an achievement, but I fear that, in terms of what it can be configured to do, I may be over-horsed! At the moment I dare not play with too many variables for fear that I loose baselines which work pretty well. For it can be made to walk trot and canter (on each lead) with more or less of the movements of up/down, backwards/forwards, rock from front to back (and vica versa), and also side-to-side roll. Some combinations are more powerful, and some are more life-like, and I am scared of unintentionally inventing some new gaits! I am also attempting to learn how to use the simulator most effectively as a teaching tool both for individuals and groups, and in the last few days when I have been on my own, this has involved becoming adept at jumping on it once it is already moving!
It is becoming clear to me that the rider can only work with one variable at a time. The photograph of the computer screen shows work in canter, and the top trace shows the variation in the rider’s weight. We hope that the changes in this are not too reminiscent of jumping up and down on the bathroom scales, but there will inevitably be some differences within each stride cycle. The next trace down shows if the rider is behind or ahead of the balance point, and the next one down shows if she is to the right or left of the balance point. Thank God, my baselines are close in each of the planes. The pink line shows the overall average, whilst the thin black line shows moment-to-moment variations.
Interestingly, it seems easier for me to make good side-to-side changes in canter than in trot, which surprises me as in general, I ride trot better than canter. However, the canter corrections I need are much harder to make on my real horse than on my computerized one, since the (live) little devil takes such great delight in disorganizing me! These corrections have evolved over many years – with significant improvements recently – into corrections that I know well but still struggle to do. However, I think I should be very grateful that the simulator is at least telling me that they are the right corrections!
The simulator also measures rein tension, with the red line showing the right rein and the green line showing the left. It surprises me that I tend to have a stronger contact on the left rein than the right, although my right hand has definitely been more problematic over the years. However the left hand is easy to fix, giving both reins a very similar trace (phew!). I spent a day last January with the simulator’s inventor, and then I was horrified to see that even when the horse was not moving, my right hand was less steady than my left. I have worked hard on that in the meanwhile – and it would seem that I have improved it, predominately through the core changes which have strengthened my right side. In terms of stability, what the arm is hung from probably has more relevance than the arm itself.
The last variable, which is seen in the bottom trace, is whether the rider is driving or retarding. Driving is the equivalent of pushing forward on the horse’s backside, whilst retarding is the equivalent of pushing back on its chest. Everyone I have put on the horse so far has been close to neutral on this, which probably reflects the emphasis our teaching places on sitting still. Shove your seat around and you get a much more variable reading.
What I and we learn from the horse over time remains to be seen, and I shall be interested to discover whether the most effective teaching tool is indeed the computer feedback. I suspect that this will be the case for more skilled riders, whilst those with less experience might benefit more from hands-on work, which can now be done with the rider in motion. We will also soon have the visual feedback of mirrors (which I have yet to set up). But I am thrilled with what I have learnt in just five short sessions, and I can envisage that many happy hours will be spent figuring things out. The simulator has potential both as a teaching tool and as a tool to keep checking that you stay (quite literally) on the straight-and-narrow. It also has huge potential as a research tool, and I am now looking forward to teaching my first simulator courses, which happen in mid January!
Early January 07
I keep powering up the simulator for a short time each day, so that I familiarize myself with every thing that might go wrong, and clock up as much riding time as I can before I begin to teach on it. It is still easier to make corrections in canter than it is in trot, and interestingly, I get better readings on the simulator if I ride it after I have ridden my horses. This is particularly in regard to the left/right balance point. Before I have been on my horses I cannot get the fixes to work so well, perhaps because my muscle tone is lower, and my focus is not so sharp. The simulator continues to help me home in on the back/front and the side/side balance points, and I am sure that this is only the beginning of a steep learning curve that will affect both my personal riding and my understanding of the issues it poses for all of us.
January
07
I have recently taught my first two weekend courses on the simulator, which were
open to both trainee and accredited coaches within my method. I knew they would
be a good client group to experiment on, and would cut me some slack if needed!
However, I do not think it was; to my great relief everything technological and
mechanical worked as it should, and I think it is fair to say that the courses
were a resounding success.
Everyone was amazed to realize how tiring and demanding the simulator is, and I was right in my reckoning that it would work best to give participants a large number of relatively short goes on it. Everyone was initially captivated by watching the rider and seeing the computer traces, but we gradually drew people away from this and into a number of other tasks that also trained balance and core stability. Throughout the weekend we kept introducing new challenges, and the buzz of the first day gradually became a quiet contentment that involved everyone chatting or watching whilst sitting or standing on some challenging piece of equipment! The atmosphere became almost meditative – although this may have been aided by the use of a computer programme which helps people find ‘the zone’!
All of the participants found canter easier to work with than trot, but we found some good ways of improving straightness at trot. Hands-on work was not as helpful as I had expected, because a very small intervention sent the rider’s weight to the opposite side! It immediately became apparent just how sensitive the simulator is. ‘Hands on’ was more helpful when people were behind or ahead of the correct balance point – although at times all I had to do was to rest my hand on someone’s back for the reading to change significantly. Using a ‘Rider’s Belt’ also helped riders who were behind the balance point. The change was relatively easy for riders to replicate on their own, and the improvements made were testimony to the learning that can be catalyzed through immediate feedback.
It is particularly interesting to stand behind riders on the simulator, and to be able to look at their backs without them disappearing down a long side or around a circle. This gives a unique view which remains stable for longer, giving the observer much more clarity on the dynamics of the body. We also videoed riders from the back and showed them that view too, which gave them much clearer sense of what it was they were attempting to fix.
It was clear that the most skilled riders have no extraneous movement from armpit level up (i.e. the shoulder girdle do not do its own little dance), no wiggles in the middle, and a pelvis which remains level even as the hind quarters of the horse each lower in their turn. In almost all of us, the torso deforms as one of the horse’s hind quarters lower, and this causes a collapse to one side. As I had expected, this is the hardest issue to fix, but we got some tremendous improvements as we became progressively more inventive in working with it.
Interestingly, the simulator shows that when a rider leans to the right with her backside slipping to the left, she weights the right side of the horse more. Bringing the left side of her butt more to the centre of the saddle helps her to keep her spine vertical (loosing the creases on the right side of her waist band), and by changing the position of the trunk it actually weights the left side of the horse more. This is somewhat counter-intuitive, but it makes sense when you think of the changes in the whole torso rather than the backside alone.
The greatest improvements came from exaggerating mistakes. One of my favourite sayings comes from Moshe Feldenkrais (originator of the Feldenkrais Method) who said, ‘When you know what you are doing, you can do what you want.’ So when you know how you make your mistake, you can choose not to make it. The best way to discover this ‘how’ is through exaggeration, and this became very liberating for many riders. It was fun to play with outrageous corrections like ‘slip to the right, and see how much you can effect the trace on the screen’… ‘now do the same to the left’. Everyone seems far more able to fall off to one side than they are to the other, and precisely how one falls off to each side is very telling. One riders ‘joke’ version of sliding off showed her the correction she needed. ‘You must be kidding.’ was all she could say as the simulator and the video camera showed her that she was now on the balance point!
We also worked with several versions of strapping various body parts to each other, or strapping riders to the saddle (which of course, one could not do on a live horse). This radically reduced some of the participant’s movement on the up/down plane, making changes they could then replicate without the straps. Several people who are renowned for ‘popping up’ felt that they have never felt so ‘down’, with so much of their underneath in contact with the saddle. The straps also offered a tremendous sense of security, and insights into how to stop lower legs from jiggling around.
I think it is fair to say that we all had a very inspiring and exciting weekend, which offered some good improvements and surprising insights. Being able to watch others on the simulator helps to give participants an overview of the issues inherent in riding, and I think this can offer more clarity than working on the simulator in a one-to-one setting. Several people have telephoned me since to say that they have never felt so straight and organized in their riding. Several others feel it has helped with their nerves or their ability to ‘just ride’.
I am excited to think about where this might lead us, and look forward to working on the simulator with riders who have less experience of my work!
